


Building walls out of shotcrete starts with the forms — everyone in concrete swimming pool construction uses them, it's just the quality that makes a big difference. It's probably safe to say that for 70% of the industry, the forms just happen to be the ground itself. Most builders use good ol' mother earth as their primary one-sided form for shotcrete application, and for many (if not most) projects, the ground is perfectly suitable.
When you get into situations with walls that are elevated above grade, however — such as vanishing-edge walls, or in situations where the soil doesn't have enough strength to dresist the force of shotcrete application — then you're faced with a different and often more complicated challenge: creating forms strong enough to withstand the force of shotcrete impact without vibrating.
Preventing vibration during shotcrete application is arguably the main issue because when a form vibrates, it weakens the concrete. That's why the rigidity of the forms is so important.
 Freestanding walls are necessary for a wide range of above-grade designs, or when soils are not suitable to act as a form.
POWERFUL IMPACT
According to my good friend, colleague and shotcrete expert Bill Drakeley, "Velocity of properly applied concrete via the shotcrete process is roughly 80 mph. This forced compaction rate should yield total encapsulation of any imbedded materials like rebar or piping. Cement mixture, water/cement ratios, application and concrete overall chemistry also play a vital role in any freestanding wall."
Obviously, with shotcrete hitting the forms at 80 mph, those forms have to be awfully sturdy. I would describe shotcrete as an almost violent process; you can sense on an intuitive level how strong your forms need to be.
It's usually immediately obvious that the soil won't work as a form, especially when you can't even dig it into the shape of a pool because it slumps and collapses under its own weight.
Pools built in sand also almost always require some form of substructure, which is a separate discussion, but we do a great deal of work at the beach and there are places that the sand just won't work as a form. In that situation, you over-excavate the site and go to work building your forms. I work in California where beach areas are a common consideration, but in other parts of the country, you run into similar issues with high water tables. There, not only do you have to build forms, you often have to also dewater the site.
RELATED: How to Apply Shotcrete
It's also a challenge to build forms in areas with significant rainfall. Again, the soil often just won't stand up and you have to over-excavate and then break out the carpenter skills.
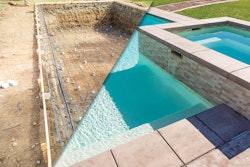
Still, as I said above, all builders working in concrete use some type of forms. For a traditional pool, the top of the wall is the critical element. We form the beam with 2-by-6 so that we create a very flat surface, which in turn makes for a clean interface with surrounding decking and the necessary expansion joints.
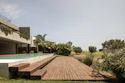
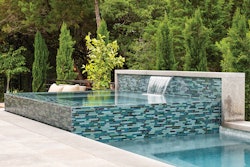
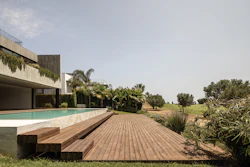
Probably the most common above-grade scenario is the vanishing-edge wall. It's always going to be an unsupported, freestanding wall, often with radii. And when you elevate above grade, everything becomes more critical. When you're building walls below grade because of soils, it's somewhat less so. In those situations, if my forms aren't exactly plumb — it maybe sloppy on my part, and you may use extra shotcrete, but no one's going to ever see it and if everything else is right, the pool will be structurally sound.
For a vanishing edge wall, which is highly visible (despite the word "vanishing"), where your finishes are above grade, you have to be dead on because everyone will see it forever. You have to be plumb, square and level. I know some people will leave it to the tile crew to float it or chip it, but if you rely on that process too much, it can lead to problems down the line with cracking and/or surface delamination.
 Whether curved or linear, all forms must be strong enough to resist the force of the shotcrete process, which delivers concrete at 80 mph.
USE AND REUSE
Our company is to the point where just about half of our projects include above-grade walls, either in part or in total. It's so common that we've started making our own forms ahead of time and reusing them.
The basic construction is straightforward. For panels, meaning straight forms, we use 4-by-8 panels of 5/8-inch plywood. We use the thick plywood because of that 80-mph shotcrete impact. We use 2-by-4 construction for framing at 24 inches on center. Because we're not holding up a ceiling, we're comfortable with 24 inches. It's plenty strong enough and it gives us more room to work than if we were using 16 inch on center.
Because our forms hold up so well, we're able to use them six or more times before we need to build new ones. I really like pre-building forms because you're not doing it on site and you can take the time to be sure they're nearly perfect, away from the hustle and bustle of the job site. And it dramatically speeds up the installation process.
We started recycling forms about a year and a half ago when I realized how much we were spending on lumber and the time it takes to build them. Suffice to say, it's a substantial savings.
We typically leave the forms on for about a week. There is some degradation each time we use them, so we've now started resurfacing our forms with quarter-inch plywood once the original panels become mucked up or damaged.
One of the reasons we don't use oriented strand board is that the fibrous surface absorbs moisture from the concrete and when you pull off the forms, all those fibers are left behind and become part of the wall. It doesn't come off cleanly. Even with plywood, you do still get a little bit of that, but we've found it's probably about 70% less than with OSB. So despite the fact that OSB is less expensive, it really doesn't lend itself to reuse, which ultimately costs more.
 Supporting above-grade forms can require some ingenuity in placing the kickers, and some fairly advanced rough carpentry skills.
AROUND THE CURVES
When we get into radii, things get much trickier. That's when we bring in a framing contractor — guys who work with wood all day, every day. We use house carpenters who are efficient at getting the contours perfect and accustomed to working on residential scales. For curves, we use 3/8-inch plywood, which you can bend into a curve. Of course, that's not strong enough, so we layer the forms with two pieces and we stagger them for added strength. Also, our bracing is far more frequent and we're staking everything off.
For most of our forms, we want to make our braces (or kickers as they're also known) at roughly 45 degrees. Sometimes when we have room, we push them out a bit for added strength. It bears mentioning that with braces, sometimes you have to get creative in finding a place to anchor them.
RELATED: Perfecting Placement: Shotcrete Application Basics
We recently had a project where there was literally no place for the braces. So we actually poured the floor of the pool first so we could anchor our braces inside the pool. We've used that solution more and more of late. We pour the floor first, water-cure it, then come back and roughen it up where it meets the walls to create a solid mechanical bond. Finally, we anchor all our forms on the concrete surface. It's an unorthodox method, but we've had great success with it and it's especially helpful with more complex designs.
REASONABLE TOLERANCES
It is possible to achieve dead-on, zero-tolerance construction using wooden forms and shotcrete, and we are always trying to get as close as reasonably possible. But realistically, we're not building launch pads for NASA or nuclear power plants, where concrete installers are literally working to zero tolerance.
There's always going to some minor variations with the panels; that's the nature of working with lumber. And, more to the point, there's almost always some variation in finish materials, be it plaster, tile or stone; they all will need some adjusting at the float stage to achieve super-tight tolerances.
And here's where I have to give a shout out to my ace tile installer, Jimmy Reed of Rock Solid Tile. He does work to the tightest tolerances on the finished surface. With his level of precision, you get substrate as close as possible, but the precision of the finish surface does not rely entirely on the formwork.
A note about finishing vanishing edge walls: We build our walls 1 ½ inches or so below the finished level. Because we're not always sure about the pitch at the top of the wall or the thickness of the finish material (customers do tend to make late changes on material selections), we give ourselves a little room for adjustments. That said, you absolutely do not want to float the top of the wall 4 or 5 inches, which you see sometimes. With float material that thick, you can run into some serious failures where the top of the wall doesn't properly adhere to the shotcrete.
COVERING THE BAR
Proper rebar installation and concrete coverage are also crucial issues. Improper coverage, meaning rebar isn't covered by enough shotcrete, is one of the most common mistakes in wall construction. Rebar that is too close to the surface is prone to deterioration from water penetrating the wall. You need 2 inches of coverage in most situations.
A less obvious question: How do you lay out a curved vanishing edge wall in space with rebar? How do you create a free line? When you get into really long walls or contoured
walls, you're really building it out of the steel in thin air and it can become open to interpretation.
I'll admit that sometimes, we're out there on the morning of the shoot with steel hickies, bending the rebar to make sure there's enough coverage. When you're basically creating the wall out of steel up in the air, the best steel crews are going to need to make adjustments once the forms are up.
RELATED: Understanding the Shotcrete Pool Application
That's all to be expected, but when you fail to make those critical adjustments, that's when you run into problems. Also, like the forms themselves, the structural steel has to be securely installed and rigid so that it doesn't move when it's being encapsulated with shotcrete. Voids created by moving bars can come back to haunt in terms of structural strength
and by creating pockets where water can accumulate and destroy the wall from the inside out.
That's the major reason we encapsulate the steel — to protect it from water.
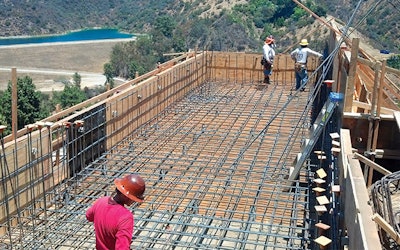
 For this project, we poured the floor first then supported the vanishing-edge wall from inside the pool.
WATER PROOFING
That leads to another crucial element. You cannot overstate the importance of waterproofing in building above-grade walls. It is a complex subject worthy of several articles this length. For now, I'll keep it very simple.
You can use colloidal silicate coating materials that you spray on, which is what we use, products designed for both positive and negative side of the wall. (Using the correct product is very important and there are differences.)
The alternative is to have an integral waterproofing agent added to the shotcrete mix at the batch plant. Because most of those products are liquid, the people doing the mix designs have to modify the amount of water they're adding to have a correct water/cement ratio. Depending on the product you're using and the amount of material you're ordering, integral waterproofing can become quite expensive.
It's true that much of the water-tightness in shotcrete comes from the compression strength, typically 4,000 psi or 5,000 in a beach area where walls will be subject to seawater. Proper density goes a long way, but because water is so insidious and destructive when it makes its way into the interior of the wall, the added layer of protection you gain with waterproofing is more than worth the cost. It's inexpensive insurance compared to the cost of a structural failure.
ONE SIDE IS BETTERIt's useful to note that the adjoining discussion focuses on building above-grade walls with shotcrete. That's a whole different world than forms built for poured-in-place applications. The big difference is, quite simply, that you're forming only one side of the wall, so you're using half (or even less than half) the amount of lumber, and therefore half the labor to build them. The American Shotcrete Association has done sustainability studies and this is one of the big advantages of shotcrete compared to the rigid, two-sided form used for poured-in-place applications. Standards and best practices for shotcrete application are found in the American Concrete Institute's Guides, 318, 350 and 506. |