


One of the most challenging aspects of putting a pool project together is choosing materials and colors — the process of connecting clients with their final finishes. It’s a crucial part of the design process, and it can be artistically rewarding, but also sometimes emotional and frustrating for everyone involved.
This is a tricky phase of the process, especially since it commonly comes after a homeowner decides which pool builder they want to trust. Many builders don’t prioritize the process or realize its impact. Nevertheless, mastering the material selection process for clients is one of the many things that will define success as a pool builder.
Though it can be difficult, this process can also be an enjoyable experience that allows your design sense to come alive while bringing your clients’ dreams to reality. As a builder, it’s important to remember this is one of the most exciting pieces of pool construction for homeowners. If you match their excitement, you can make this a highlight of the entire pool experience, stand out from other builders and increase your chances of getting a great review.
This article is by no means meant to be an all encompassing guide to the selections required in even the simplest of pools, but more of a review of the basics, which is always helpful.
Lead With Character Images
You may want to consider introducing ‘character images’ to your process. These are images which support your design intent and are arranged in such a way to indicate what material or product the image showcases. The source of the images can be your previous projects, suppliers and material manufacturers, and images gathered by your client. Assembled together, these images support your proposal and design in an easy-to-understand manner.
Character images give you a place to start as a designer and can be pointed to when explaining why you made certain material selection choices. As you move through the selection process, add selections and options to the character images so you have a visual reminder of what has been chosen and what is under consideration.
3 Different Approaches to Material Selection
In my career, I’ve worked in three different regions of the country for three entirely different companies. Therefore, I’ve had the unique pleasure of seeing the material selection process completed in three contrasting ways.
- Keep a well-stocked design center with interior finish selections, hundreds of tile selections, and installed deck materials, as well as numerous photo albums to assist in the process.
- Give each designer interior finish samples, 10 to 15 different tile options, and photos of deck materials with the intent of making selections at the client’s home.
- Keep a well-stocked design center with interior finish samples, installed deck materials, and some tile selections. Typically order tile samples for each project on an as-needed basis.
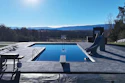
 Photo courtesy Austin Water Design
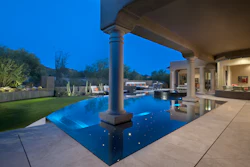
Selection 1: Interior Finish
The interior finish selection is often made before tile, coping and decking. The combination of physical samples and photos showing the texture and color of what will be installed can often be enough to convey the product.
Although, even after physical samples and photos, some clients still won’t be able to make up their mind. To better assist the clients who just cannot choose from samples and photos, I’d suggest keeping a spreadsheet of all built projects with finish colors. That way when a client asks, “Is there a pool I can see with this installed?” You have easy access to the answer. You might be surprised at how many of your past clients would love to show off the pool you built for them.
Selection 2: Tile
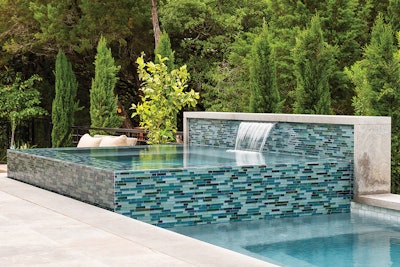
After the interior finish, next comes the tile. Tile is often the most difficult selection due to the numerous variables involved. However, in my opinion, there are two basic theories with tile selection. First is to choose a tile with the intent to blend it into the interior finish color and make it disappear. For example, if you’re doing a white plaster interior finish, use a white tile and grout. Second would be to make the tile a design feature itself. This is where the iridescent glass tiles and bright contrasting colors come in. Traditionally, pool tiles are a contrasting color. Think of the cobalt blue tile and white plaster combination we’ve all seen on older pools and commercial pools.
Whatever direction you are going design wise, whether contrasting or blending into the background, getting the tile samples can be a source of frustration. It can seem like you either have the sample in hand but the tile no longer exists, or you don’t have the sample. One manufacturer, Classic Pool Tile and Stone, makes it easy — simply fill out a web form, and the sample shows up a few days later.
Outside of the big pool tile manufacturers, there are other sources to consider. Be careful, though — in most parts of the country, you first need to confirm the tiles are frost proof. This often means going to porcelain tiles and avoiding ceramic. Also note that some glass cannot be installed in freezing climates. Be sure to check the cut sheets for pool/spa and freezing climate compatibility before selecting. Then get those samples.
It’s also a good idea to keep extra sets of your preferred grout samples on hand, as they have the tendency to disappear like socks in the laundry.
Selection 3: Coping and Deck
Generally speaking, you’ve approached this step of pool design in one of two ways. Either you’ve designed the pool to have a poured concrete with cantilever edge over the tile, or you have a stone or precast coping with a unit paving of precast concrete or stone at the deck.
As you can see, there is a wide variety of options. Without strong, designer-led navigation of the process, analysis paralysis can set in quickly. When in doubt, go back to your character images and pull samples and options based on what you know your client already prefers — instead of starting from scratch each time you go to select deck materials.
Especially if you find yourself going round and round with a client that can’t pull the trigger on a tile or deck choice, remember that how you handle this exact moment in the build process will have a big impact on your client’s estimation of you, and the final result of your work. If you are patient, helpful and well-organized, it can help keep everyone happy through the long building process.
Scott Pancake is a pool and landscape designer with over 20 years of experience. He’s worked in three different regions of the country: New England (SSG), Austin, Texas (Austin Water Designs) and Arizona (BYOP). He is currently a landscape designer for ZEN Associates, a global boutique landscape and interior design firm in Boston, Mass. In addition to ZEN, Scott founded Backyard Assist, a media site designed to help homeowners navigate tough questions in their backyard.