


Builder/designer Bill Drakeley is passionate about concrete and has devoted his career to the pursuit of creating the finest pool shells possible. A recognized authority in the shotcrete placement process, Drakeley has made it his mission to share what he knows about concrete science and application in an effort to help ensure a future defined by fewer structural failures and ultimately improve the industry’s performance and reputation.
Concrete is the construction material used most by humankind — wood, stone, brick, asphalt and glass don’t even come close. In a sense, our world is made out of concrete and I am among those who believe the very best way to apply it, without question, is by way of the shotcrete process.
The reason that shotcrete, both dry and wet (both versions of the “pneumatically applied” process) are superior to other forms of properly mixed concrete application boils down to one word — velocity.
When you shoot concrete onto a form or the earth at 300 to 400 feet per second, it compacts and becomes dense. The problem is, most people, even those in the pool and spa industry who use shotcrete on a regular basis, often don’t understand the basics of installation, beginning with proper velocity.
That starts with an air compressor with enough air volume (CFM) to deliver the required material at the desired speed. Unfortunately, most companies I’ve come in contact with use compressors that are undersized, delivering, say, 185 cubic feet per minute — not nearly enough capacity to drive the wet mix properly into place. (More on compressor size below.)
That’s just one common mistake that compromises the end product. Beyond that most basic issue, there are a number of specific measures before, during and after the application process that must be scrupulously observed; otherwise, you’ll wind up with an inferior product that doesn’t provide the structural integrity necessary to create a watertight pool vessel. The ACI has always stated that structural concrete built for water retainage or a water environment needs to have a minimum compressive value of 4,000 PSI (ACI-318, ACI-350).
With that in mind, let’s dive right into the basics of making the most of pneumatically-placed concrete.
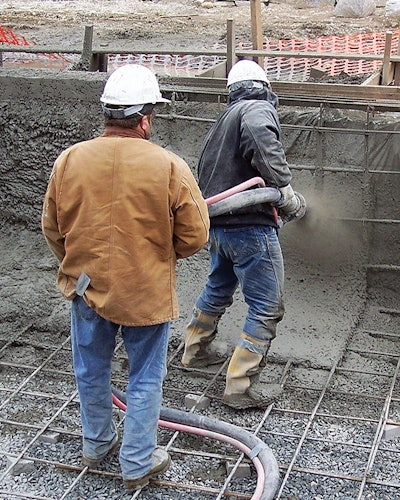
 Proper shotcrete placement requires everyone, from the pump operator to the nozzleman, to know his role.
PRIOR TO PLACEMENT
To begin, you must be certain the substrates receiving the concrete are rigid and non-vibrating. That means your forms must not move during application and the soil has to be competent enough to provide a solid support. Your steel and form installations should be built to structural specifications based on the soil conditions and set up to withstand the impact of the concrete as it’s shot into place.
One of the ironies here is that by using compressors that don’t deliver adequate velocity, forms don’t need to be as rigid to prevent movement. That’s what one might call a fool’s paradise, because as stated above, it’s material velocity that produces reliable compaction. (Velocity = compaction, compaction = density, density = strength, strength = water tightness.)
Beyond that rigidity of the substrate, there are a number of other pre-placement issues, all of which, if not observed, will result in inadequate structural integrity.
• The excavation site should be free of standing water. You should have a layer of stone in the bottom of the pool to ensure control of subsurface water movement.
• Steel should be raised 2 to 3 inches above the floor and away from the sides. The American Concrete Institute specifies a minimum 2-inch coverage around any concrete encapsulated reinforcement.
• Freestanding walls require support mechanisms so there is no vibration. These walls should be secured and fastened properly.
• All plumbing lines should be mounted firmly in place if they are to be part of vertical wall. Otherwise, run plumbing in the floor stone to avoid vibration during the shoot, and make sure the plumbing is pressure-tested. (Consider the difference in hassle and cost of correcting a plumbing problem before the concrete is installed versus afterwards.)
• All of these preparations should be inspected and verified prior to the shoot.
What happens if you get these basic measures wrong? If you have movement of a pipe or a piece of steel, you’ll leave a shadow or gap in the concrete which increases porosity and permeability. This can also lead to cracking.

In that scenario, even if the shotcrete applicator has done everything correctly, delivering concrete that measures 4,000 psi on a compression test, the flawed preparation results in an unsound structure, which in turn leads to surface failures or water loss.

Bottom line: Proper substrate, plumbing and steel preparation are essential to create a reliable concrete shell, no exceptions!
 After placement, the success of the project depends on crucial details including “cutting” the interior structures to their exact specified shapes and wetting the concrete as it cures.
DURING THE SHOOT
Let’s assume everything is right prior to the shoot, all verified and built to spec, the substrate is dry, free of debris, etc. Unsurprisingly, the application process also comes with an important checklist.
• First, be sure you have the proper equipment for the shoot. As mentioned at the outset of this discussion, undersized compressors represent one of the most common mistakes. Be sure the unit you’re using can deliver that all-important (and newly recommended) 250 CFM minimum for wet (shotcrete), or 700 CFM for dry (gunite). You can never really have too big a unit, because to compensate, you’ll merely have to either step back or turn down output. Inadequate CFM is always, always the problem! In addition, you have to be sure the pump for wet mix or gun for dry mix respectively have the capacity or ability for the shot process.
• Equipment setup is crucial in that you want it as close to the shoot as possible. When you close the gap between the pump and where the material comes out of the nozzle, everything works better and more efficiently. In the pool industry we’re doing small-line pumping, meaning we’re working with 2-inch hoses, pumping or gunning between 8 and 10 cubic yards of concrete per hour. When you are forced to shoot for distances of more than 100 feet, you have to account for the loss of velocity that takes place due to the friction inside the hose, as well as diminishing air pressure and changes to the concrete mix that occur over long distances.
When the wet mix concrete is pumped a long distance and the heat from friction builds, the composition of the concrete changes in that the liquids, fines and cream begin to migrate to the interior surface of the pipe while the aggregates stay in the center. When you have that separation of material, the aggregate may not be properly coated by cement paste, which means you’re not delivering a mix design to the nozzle that can be properly placed.
• When shooting, shoot everything. What I mean by that is never start hand-packing large volumes of material. This does not mean finishers can’t hand-compact and work into place material at guide wires with finishing tools. Again, the velocity is critical in that it is necessary to compact the material and fully coat the aggregate. When you start placing shovels full of material by hand, the process is no longer monolithic. Do not, under any circumstance, use rebound in steps, walls, benches, floors or anywhere else. When you hand-pack, you are no longer using pneumatically-placed concrete. You’ll get weep holes, seams, separations and all sorts of points of weakness in the material.
• The distance between the nozzle and the substrate should be no farther than 6 feet, always at a 90-degree angle to the receiving surface.
• Always start in the corners or the radius first. It reduces trapped rebound, which is generated to a greater degree when first applying the material to the substrate.
Shooting in layers: I’m a proponent of full-thickness shooting, meaning you don’t build up the walls and floor in layers. The concern is that the material won’t stand up beyond a certain thickness. When shooting steps or other structures that are more than 12 inches thick, we will use a layering technique. For walls and floors up to 12 inches, we use a full-thickness shooting technique. Layered shooting is absolutely acceptable as long as each previous layer has been properly prepped to receive new materials.
• Air temperature can be an issue. According to ACI, you should be shooting between approximately 40 and 100 degrees Fahrenheit. You can bypass those parameters with mix chemistry in the form of either retarding agents or accelerants. Personally, I’m not a big proponent of admixtures for the pool industry in a local short travel shoot because in most cases simplicity of mix design is better understood with most pool crews.
• Thieves of strength: In order to achieve desired strength, you must avoid the “thieves” that will reduce strength. First, do not add extra water to the mix for the sake of speeding up the placing process. Doing so will result in shrinkage cracks and other failures. Next, when the concrete mix truck arrives, start shooting right away. You always want to use the material within 90 minutes from when the truck was loaded or 45 minutes from when your material is placed in the dry-mix gun to maintain proper moisture content. Next, you need proper ratio of cement, aggregate and water. A typical ratio is four to one aggregate to cement. If you decrease the binder/Portland to save money, you’re cheating the end product because you’re not properly coating the aggregate with cement paste.
• Orchestration: The process of applying either shotcrete, dry or wet, should be carefully choreographed. A typical crew consists of the nozzleman (the most important member of the team), along with the pump operator or gun operator, hose tenders and finishers. Everyone needs to know their job and be aware of what’s going on as the work progresses. The best crews anticipate what’s happening and make appropriate adjustments for each other.
POST SHOOT
• Once you’ve finished shooting, a thorough cleaning of the equipment is critical. All hoses and the nozzle need to be free of any residual material. This is essential for proper function at the next shoot.
• Setting up for curing is the next step and of extreme importance. The concept is simple enough. You have to make sure the surface stays wet as the concrete cures to prevent the evaporation of mix water. The idea is to allow the water in the mix to hydrate all the cement particles. The more particles you hydrate, the more strength you gain. Those chemical reactions generate heat, which promotes evaporation of the mix water. Therefore you want to keep the exterior temperature cool, which in turn reduces evaporation and leaves more water available for the hydration process – all of which leads to a stronger end product.
Contrary to what some people think, you’re not adding water to the surface with the idea that it’s penetrating into the concrete. If that’s happening, the concrete is no good to begin with. You’re curing to minimize temperature gain, which in turn minimizes evaporation and maximizes strength.
The surface should remain wet for the first seven days minimum. You can use misters, soaker hoses, sprinklers or even wet burlap if you’re in an area with water restrictions. However you do it, the concrete must be wetted for at least seven days.
ELEVATING THE GAME
If you follow the above measures with each and every project, your results will be far superior to the majority of concrete pool structures now being built. In my years studying pneumatically placed concrete and teaching people in our industry how to do it correctly, I’ve found numerous examples where every basic step I’ve outlined here has been compromised to some degree or another.
The result is an inferior end product usually of low compressive strength, all of which leads me to a final point.
Over the past few years I’ve stirred up more than my share of controversy saying that waterproofing agents should not be necessary. The reason I say that is if you initially (design the mix and shoot to) achieve 4,000 psi concrete, the shell is well on its way to becoming water tight without any additional membranes, coating or penetrating sealers. Unfortunately, the vast majority of projects don’t meet that standard and waterproofing becomes a necessary prophylactic measure.
I’m not an opponent of waterproofing per se, but rather a proponent of quality concrete. When these fundamentals are followed, we create structures that will endure the test of time. Miss those marks and you’ve stacked the deck in favor of failure.
Consider this final thought: In the end it doesn’t cost more to do the job right, it only requires that you embrace a set of basic and necessary steps. Doing so will ultimately save money and heartaches down the line.
There’s simply no downside to doing the job correctly. I’ll go so far as to argue that as professionals we have what amounts to a moral obligation to follow guidelines set forth by ACI/ASA and give our clients the best possible concrete structures (yes, a shell that does indeed hold water), each and every time you fire up the equipment.
Comments or thoughts on this article? Please e-mail [email protected].
Wet v. Dry
Many in our industry believe that either wet shotcrete or dry shotcrete is superior to the other. That’s simply not true — both methods can produce quality concrete if used correctly. The difference is that each method can be better for certain types of applications or certain regions of the country.
Our firm uses wet mix shotcrete because we work in high-volume applications most of the time, not only building large swimming pools but also doing work in highway and subway tunnels. Wet mix is better suited for those applications. Dry on the other hand is better suited for smaller applications when you’re starting and stopping more frequently. Dry or wet are equally suited for the swimming pool industry.
So, the difference is really like the hammer and the screwdriver, it depends on the application. But for the record, both wet mix and dry mix are the best methods of concrete application, no ifs, ands or buts about it.
Seamless Structures
In shotcrete, there’s no such thing as a cold joint. You can stop shooting and come back a year later and if the surface and surround are properly prepared you can resume shooting and still come away with a monolithic structure.
We use a method called Saturated Surface Dry (SSD), which simply means that after you’ve roughened a receiving surface, cleaned out the pores and the surface is free of loose material, it is then wetted or dampened as a condition of the substrate which helps ensure good bondability.
For many of our commercial projects, the vessels are so large that they require multiple days to shoot. Using the SSD procedure, we create what are known as construction joints, which in effect disappear completely once you resume shooting. It’s not a so-called cold joint, control joint or expansion joint, these “joints” don’t exist in shotcrete construction.