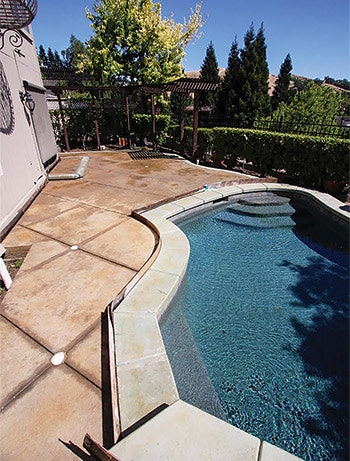
 We've preset our surface deck drain locations so they align with our deck score joints. In the foreground we have two drains placed closer together because of the narrower deck area.
Drainage is important. Your ability to control the presence of water on any particular job site is one of the keys, perhaps even the decisive key, to the long-term success or failure of that project.
It's also different from other features in the landscape in that drainage is largely hidden — and therefore easily ignored — at least initially. With many other project elements, if something's not right it becomes immediately obvious. With drainage, the negative effects of an inadequate system can take years to show up.
That's why drainage is often overlooked. For a while everything seems fine, but water is the universal solvent, and it's extremely opportunistic when left uncontrolled. It will do damage if it's allowed to accumulate over time.
We've seen devastating results in pools due to prior contractors' lack of attention to drainage. Water builds up behind walls, slowly penetrates the walls' structures through wicking action and then shows up in the form of damage to whatever masonry material the wall is made of and finished with. The damage can be costly and difficult to remedy once it's done.
The good news is, like so many aspects of pool construction, problems due to lack of drainage are entirely preventable.
 The area behind this project's retaining wall has been over excavated and the initial waterproofing has been applied.
SITE REQUIREMENTS
When you're working with a blank slate, a new property or a dirt backyard, there's not much forensic work to do where drainage is concerned. It's all about planning for the future and making sure rainwater runoff and groundwater have somewhere to go.
It's always an advantage if you can direct flow via gravity to a storm drain or somewhere water flows naturally. On some projects, you have to create a sump or a dissipation chamber to accept runoff and/or pump accumulating water off site. Soils and topography will also have an impact on drainage system designs.
RELATED: Beating Pool Drain Entrapment With Proper Plumbing
For existing landscapes, such as in a remodel project, I'm primarily looking at retaining walls and raised pool walls where there's a surcharge against the backside of the wall. Those are critical areas where water can gather and do damage. That's why we put French drain systems and waterproofing behind all walls where water can gather. We're also looking at the deck drain systems to see if standing water has been an issue.
We've worked on properties where some prior work was done by a site developer who has already installed a subgrade drain system. In those situations, we gather as much information as we can from the developer, the homeowner and a title search, which will sometimes have documented as-built drawings.
Basically, we're doing whatever is needed to be sure we're capturing and transmitting all excess water off the site so that it doesn't do any damage, whether it's rain water via deck surface drains, or water that is migrating underground.
 The French drain plumbing has been installed with a multi-flow drainage composite material from MiraDRAIN that aids in the disbursal of water away from the retaining wall into the drainage system.
ON DECK
Decks and deck drains are probably the most commonly used drain systems associated with pools, and almost certainly for yards with no pools. With very few exceptions, all impervious decks need drains.
Decks around pools should always direct water away from the pool itself. All decks should be pitched so that water flows toward the drains and nowhere else. You do not, for example, want to see water gathering at the base of walls or the sides of the house. It all must flow to the drains where it's transmitted off the property to some other point of safe disbursal. Some systems are designed around the concept of sheet flow runoff, which when uncontrolled can cause damage in some situations. Some jurisdictions favor designs that use sheet flow to capture as much water as possible on site.
The main thing is to avoid puddling. If water sits and starts to build up algae or if it freezes, it becomes a slip hazard. And standing water can lead to discoloration of deck finishes. As a rule, we're looking for a 1/4 inch per foot of pitch for exposed aggregate deck surfaces. For smoother finishes, such as a broom finish or even a very soft stamp finish, we might go as shallow as 1/8 inch or 3/16ths.
As for drain frequency and layout, it largely depends on the width and overall size of the deck. The narrower the deck, the more frequent the drains should be. In a 3-foot skirt deck, for example, we'd have a drain every 6 to 8 feet. In a 5-foot band of deck surrounding the pool, we'll locate drains every 10 feet. There's a balance you want to strike with deck drain locations. The farther apart you locate the drains, the more undulating the deck will appear because you're creating more vertical transitions between the high and low points. The closer the drains are together, the shallower the peaks and valleys in the deck.
Some people will try to save time and money by going with as few drains as possible, regardless of the deck's appearance. I believe you get a more even look and better drain function with more frequent drain locations.
In most situations, except extremely large expanses of deck, we're using 3-inch or 4-inch PVC drain pipe. We don't use any flexible corrugated pipe. It takes more effort doing it our way because the pipe is rigid, but it's smooth bore and stronger, so it lasts longer and doesn't build up silt the way corrugated pipe does, which can become a fertile place for things to grow and become plugged up over time.
RELATED: Slot Drains Eliminate Entrapment Risk And Unsightly Floor Drains
We typically use 4-inch drains with brass drain covers. Plastic covers are and look cheap in my opinion and they break over time. Brass lasts indefinitely. Finally, we always glue our drain pipes and fittings. Surprisingly, for reasons of ease, a lot of contractors just stick the pipe and fittings together without glue. This just invites future failure. As the ground moves and fittings begin to separate, water will migrate outside the drain pipe and the cracks will invite root intrusion.
We also do on occasion incorporate channel drains or strip drains in situations where you want to minimize the visual impact of drains. We'll slope an entire area toward a channel drain, where we've usually configured a curb of some kind by the drain to help capture the water.
 The French drain 'burrito' is tucked neatly behind a retaining wall.
THE FRENCH BURRITO
As mentioned above, groundwater building up behind retaining walls (meaning any wall that has dirt behind it) can cause tremendous damage. That's why on all of our projects, in all situations, we install a French drain system behind walls.
Here's how we do it: Let's say, for example, the wall is part of the pool shell. We over-excavate outside the wall, about a foot wide and deep enough to extend to the bottom of the wall. This is where the French drain system will go. But first we strip the forms and waterproof the wall. For curved or irregular walls, we use a product called HLM 5000, a super-tenacious elastomeric waterproofing membrane system designed for below-grade applications. There are other waterproofing membrane products on the market including Mira Drain and Bituthene. We roll on two thick coats, which we've found does a great job protecting the wall from moisture intrusion.
Then we install our French drain system into what we call our "burrito." First, we line the trench with filter fabric, with an extra two feet laying outside the trench. We put into place a specific 3- to 4-inch perforated French drain pipe with holes predrilled and facing down. Then we fill the space with round or angular drain rock, which has no fines, and then we fold the extra fabric back over the top, tucking it in against the wall completing the burrito.
It works beautifully every time — meaning we've never had trouble with groundwater impacting our retaining walls or raised pool walls.
WHERE IT GOES
All drainage from decks and French drains can be directed to the street, where it flows into storm drains along with all the other runoff from the immediate surrounding area. We try to set up our systems so it's following that same path. It's usually fairly simple.
RELATED: The Incredible Mistake a Service Pro Made
The exceptions are locations where the site is absolutely flat and there's no way for water to flow off the site by gravity. In those situations, you pick a spot and dig a sump — basically a hole in the ground where you construct a concrete box that's big enough to temporarily contain the captured water. You set a sump pump in the bottom of the sump that's operated by a float switch and wired to an elevated junction box set outside the sump.
All drainage water flows into the sump, and then as the water rises to a preset level, it activates the pump, which sends the water to a predetermined safe location. We've also worked on projects where all the drainage is routed to what are referred to as "dissipation chambers," which are big pits filled with drain rock that enable the water to percolate into the ground. Sumps and dissipation pits are often lined with filter fabric to reduce the fines that can find their way into the layer of two-inch plus drain rock, and plug it up over time.
Ultimately, my favorite drain system is completely gravity fed and flows neatly to a safe location and then out to the ocean.
Always check the codes in your local jurisdiction for specific drainage requirements and restrictions.


