Skimmer replacement is a higher level of repair — closer to remodeling. There's a great deal of labor involved in replacing a skimmer, and doing it right requires a high level of skill and commitment to the integrity of the project. If done incorrectly, problems that can go unnoticed for months to years are likely.
Ideally, as the level of difficulty increases, so do the margins you earn. The net return on a typical skimmer job can be significant — but, of course, you have to know what you're doing in the first place. For me, tile and coping repair and skimmer replacement were two of the key areas that propelled me from the service route into contracting for larger projects, which eventually resulted in my evolution and chosen direction designing and building custom pools.
(Note: if you're moving into these types of repair work, it's important to be aware of the statutory licensing requirement as it relates to doing this type of underground repair.)
Here we'll take a look at skimmer replacement in two parts. In this first installment we'll examine work assessment, site demo and skimmer removal, day one of most repairs. Next month, we'll return with a look at placing the new skimmer and the finish masonry work that takes place on day two.
Yes, there are many people who try to do it all in one day. It certainly can be done, but I tend to think more conservatively in terms of contingencies. Planning two days will usually give you leeway in your time frame for the unexpected. I typically tell my clients that the water level in the pool will be low – anywhere from 6 inches to 30 inches – for up to a week because sometimes it's difficult to schedule two days back to back.
NEED TO REPLACE
 This shows where duct tape has been left along the skimmer throat, which is a common cause of leaks.
There are a few different factors involved in determining whether or not a skimmer needs to be replaced, but it usually comes down to whether or not the skimmer is leaking. Over the years, it's become no secret that in general, skimmers are one of the most notorious points in the pool system for leaks, which can happen in a few different ways.
Sometimes, particularly with older pools, simply knowing the type of skimmer can present a strong indication. As an example, one of the skimmers most associated with leaks and eventual replacement was the original model U-3 black bottom skimmer from Swimquip. (The modern, much improved uni-body version is made and sold by Pentair, among other manufacturers who use a similar skimmer design).
The original version had a black neoprene-like material on the bottom. Over time, the thread tolerance in the material would relax and start to leak. Also, it was a two-piece skimmer where the black bottom section was screwed to the skimmer body with an O-ring seal, creating another common leak source.
There are also different workmanship-related issues that will result in leaks. One of the most common I've seen happens when the tape that was placed to protect the skimmer throat during the gunite process is not properly removed prior to the tile installation. Whether it's the gunite crew or the tile contractor, the tape must be fully removed otherwise it will work as a bond breaker, making a proper seal in that area impossible. Over time that will result in what will be a very slow and often undetectable leak that will increase in severity.
Because water seeks the path of least resistance, the leak will migrate into the surrounding gunite and steel reinforcement.
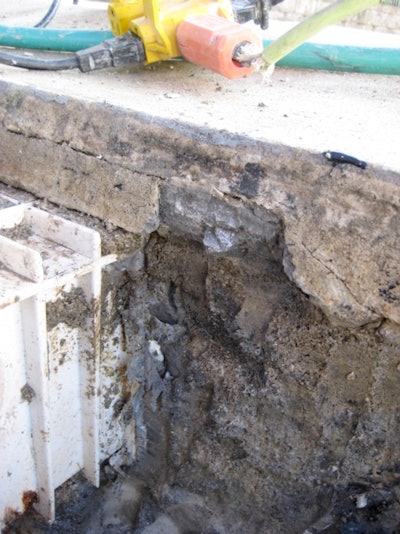
 At this point, we're about 80 percent through the removal process. I'll use a 5-inch diamond grinder to make a deep incision along the grout joint at the edge of the tile and remove that material to make room for the new skimmer. Also take note of the area where the leak was most damaging - where the steel is rotted out near the roots on the right side. (An example of looking out for plumbing.)
Using rebound is another notorious construction defect that makes this problem worse. Rebound lacks structural integrity and the compressive strength of properly applied gunite, and it absorbs water more readily as a result.
The water acts like a cancer that spreads, compromising the structural strength of the skimmer area. In its most advanced state, the leaking water will corrode the structural steel, which is placed and intended to tie the skimmer structure into the pool. When that happens, the skimmer can recede from the pool wall, creating an even more severe leak.
Finally, there's the potential issue of earth movement in geologically active regions, which can cause structural leaks or fracture plumbing fittings.
In almost every case, a leak at the skimmer is found during a leak detection process, either by pressure testing or dye testing around the skimmer face. Whether done in-house or by an independent leak detection firm, I always recommend proper leak detection in order to confirm the skimmer is in fact leaking. This is not a place for guesswork or presumptions. The last thing you want to do is move forward with the project to find that the skimmer is in fact not leaking.
RELATED: A Pocket Guide to Building Vanishing Edge Pools
OPEN ASSESSMENTS
 We've cut the deck and made our way down through the gunite, which has been removed to locate the plumbing lines. Here, about 70 percent of the material has been removed.
CUT CONTROL
Now it's time to get to work removing the deck around the skimmer. Before beginning any demolition work, it's important to protect the plumbing lines. I like to use old tile sponges that are cut in half and simply shove 'em down in the hole.
Again, the type of deck will dictate your cut design. For projects where the intent is to achieve a patch that will be less visible, such as with tile or flagstone decking, I use a diamond saw to cut a 2-by-2 foot area centered on the skimmer lid, working back from the expansion joint on the coping edge. If working with a cantilevered-style deck, the front cut will be located directly above the front edge of the skimmer throat.
If I'm working with a concrete skirt deck, I might opt to cut the deck at the adjacent control joints and replace an entire section because the look will be cleaner with the new and old concrete meeting at the control joints. Keeping with that idea, I will expand the size and shape of the cut to eliminate existing cracks in the deck.
In situations where you're not trying to match the existing deck, you may want to take into account the deck's characteristics (i.e. brick or pavers, where you have a fixed size) so your cuts harmonize with the surface.
You also have to adapt to the skimmer location relative to the pool. Some are right up against the pool wall; others are set farther back. (The toughest are those that inset towards the pool underneath a solid edge treatment of some kind that you don't want to disturb.)
Once you've cut through the deck, the next step is to carefully remove all the material from around the skimmer. I typically use a 60-pound electric jackhammer for the removal of the concrete deck. I start breaking the concrete 2 or 3 inches away from the skimmer opening, working around the skimmer, emanating out toward the saw cut. If you work from the outside in, you'll run the risk of damaging the edge of the deck that you want to preserve.
(Sometimes even with best practices there can be some collateral damage to the surrounding area. In that event, following the skimmer removal phase, I've been able to make final detail cuts to remove any chipped or broken edges.)
The most delicate area will be the space between the skimmer lid and the back of the coping and bond beam. That's where it's most critical to get as deep a saw cut as possible, without cutting into the coping, to control the pressure exerted against the adjacent edges during the demo process.
I usually try to leave coping in place — especially if it's well adhered — but if it's delaminated, I'll saw cut its mortar joints out as well, which will allow me to safely remove and reset the coping/edge treatment as part of the repair. Again, that's another aspect of the project that you should be able to determine in advance and discuss with clients.
RELATED: Perfecting Placement: Shotcrete Application Basics
DIGGING DOWN
With the deck out of the way, I begin removing the gunite around the skimmer with a large roto-hammer, typically with a chisel bit. Some people use jackhammers, but I find that tough on the back of the operator; it's difficult to control and therefore far less precise. Precision is especially critical when removing gunite from an area where you want to preserve the plumbing. There are times when will we hit extremely hard gunite and will then break out the jackhammer for limited and careful use, but for the most part I appreciate the ease and control of the roto-hammer approach.
Note: for areas requiring extreme precision, such as detailing around the skimmer throat tile interface or carefully removing gunite from around a pipe, I'll reach for the smaller roto-hammer.
Unless the water damage has been pervasive, which has a tendency to rot everything, you'll remove the material around the skimmer and find the steel "cage" that wraps around it. Most skimmers will have three bars, typically #3 or #4 rebar wrapping the skimmer.
These bars are part of the pool's structural steel and will extend into the skimmer box on either side of the skimmer, approximately 9 to 12 inches apart, top to bottom. There will also be two vertical pieces coming from the bottom area of the skimmer box that tie in and support the horizontal bars at the back of the skimmer.
I usually try to leave the existing steel in place as added support unless it's completely destroyed. I'll carefully bend it up out of the way and work around it as I continue removing the material.


Moving down through the gunite, and assuming we're working with a plastic skimmer, I'll incrementally cut or break the skimmer throat. I generally remove all of the gunite making up the skimmer box. It's also very important to remove any additional leak-compromised, soft gunite material — oftentimes exposing additional steel reinforcement — which will usually be at the wall and bond beam areas, again ensuring you leave behind solid material.
 Here we see extensive damage from a leak. You can see from the rust in the steel how the leak has migrated. This is an application where we were able to saw cut the coping stone above the skimmer throat and remove it.
Sometimes it can be so bad that entire section of pool wall is compromised to the point where you need to go back to the client and discuss rebuilding that part of the pool wall. (To learn more about repairing structural cracks, visit aqmag.co/repairingcracks)
You also need to be on the lookout for the suction line, which you'll generally run into anywhere from 4 inches to a foot under the deck. Most commonly, the line will extend straight back from the skimmer at six-o'clock, but on occasion, it may come off at a side angle. Sometimes you pre-identify the direction by looking at the fitting at the bottom of the skimmer.
You'll want to cut this line at a point that will be conducive to re-plumbing to the new skimmer. Once cut you can remove the sponge from the discarded line and put it into the line you're preserving. For both suction and equalizer lines, it's important to leave enough of the existing plumbing to reconnect to. Likewise, if the lines are copper, you'll want to leave enough suitable pipe to solder on an adaptor when you install the new skimmer.
Note: with the U-3 style skimmer, as mentioned above, the equalizer/main drain line will be located at the bottom of the skimmer and should be the front port. In other models, that line maybe oriented elsewhere, oftentimes coming in through the sidewall.
Once I've removed all compromised gunite and are left with solid material, I'll use a pressure jet nozzle to hose down all of the interior of the skimmer box to remove any remaining dust and loose material.
Now you're now ready to move into the installation process, which we'll cover next month in part 2.


