
Working on hillside properties with bad soil conditions and limited access is no picnic or a place for beginners, says master designer and builder David Tisherman, who recently completed one such project in a wealthy Los Angeles enclave. Here he launches a three-part series of articles covering the construction process with an eye toward the details that make or break residential work at the highest levels of difficulty.
It was a project that came with a million dollar view and probably more than that in terms of the challenges that came along for the ride.
Located on a bluff in Southern California overlooking the Pacific Ocean in one of the most exclusive and expensive neighborhoods in the region, the site is cursed with some of the worst geological conditions I've ever seen, with layers of incompetent soil and a system of bedding planes that create a natural slide condition. There were code issues with impermeable surface limitations, virtually no access for equipment and materials and a true eyesore of an existing pool that had been there for about 50 years.
 Figure 1
My years of experience have taught me that designing, engineering and building in these conditions takes time, resources and most of all, the highest possible level of experience among all the project team players. By contrast, the existing pool was anything but the product of professional effort. It had been built at a time when there were virtually no standards for pool construction or any understanding of true design on the part of pool builders.
It was the type of situation where everyone involved had to prepare for the unexpected, which turned out to be exactly the case. Despite all the hurdles, the sheer beauty of the setting was almost crying for something special in the form of an aquatic environment that would complement the scene and beautiful home. For all of the grandeur, however, I knew simply getting started would involve a process that was not for the faint of heart.
 Figure 2
Lay Of The Land
Working in our favor from the start were clients who came into the process with a sound inkling of the level of difficulty because they had already done some of the homework. They had first seen my work in Luxury Pools Magazine (much of my work comes from referrals from LP) and from there they had gone on-line and researched a handful of builders. They liked the look of my projects and appreciated that my crews and I have experience with massive hillside construction.
After my first site inspection and some very frank discussions about the level of difficulty I anticipated – the extended time frame, hefty budget and the specter of dealing with unknown potential issues – we decided to move forward.
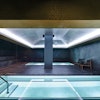
After working through various ideas our original concept was based on pushing the swimming pool location away from the home and out toward the view, where we would create a classic vanishing edge effect. Although I'm one who believes the vanishing-edge is vastly overused these days, the water-on-water view overlooking the Santa Monica Bay and coastline would have been spectacular (Figure 1). That scheme would have involved using the area where the existing pool was located as a deck for entertaining and creating a new pool structure that extended out over the slope on the back of the lot.
 Figure 3
Unfortunately, we ran into trouble with that concept from the start. When I met with the local building department officials, I was told there was a major issue with an impervious surface calculation, a concern I run into frequently on the east coast. It's a fairly complex issue but in the simplest terms this meant that we could not expand the hardscape area in the backyard because a percentage of the space had to remain lawn or other softscape – a type of regulation you run into in coastal areas where there's concerns over controlling runoff and slope stabilization.
One of the key concerns in this case was that the existing pool area was perched on a terrace six feet above the natural grade surrounded by a retaining wall. The building officials told us that we could not, under any circumstances, remove that retaining wall. Not only did the walls have to remain in place, the decks surrounding the pool also had to stay put because they were attached to the walls and had been used to help hold them in place, similar to the way a "dead man" works.
(As it turned out due to the type of soils reconstructing the retaining wall system in a different location would have meant creating a system of friction piles and grade beams, which would've added somewhere between two and three hundred thousand dollars to the cost of the project.)
 Figure 4
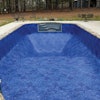
In effect, we were told that the new pool had to stay in the existing location. Although the walls needed some repair, they had stood the test of time and for as ugly as the existing pool was, it hadn't moved (Figure 2). There was no cracking, no broken pipes nor other indications of structural damage.
So, we changed directions. After rethinking the situation, I came back to the clients with a plan that involved cutting out the existing pool and dropping a new one in its place. Once we had that plan in place, we went into extensive discussions about what the clients wanted in terms of surrounding dining and entertaining features, colors, material and how the new pool would complement home.
Access Doesn't Exist
I'll describe the design in detail in a subsequent article; at this point in the process we were left with the tough question of how exactly we were going to handle the site preparation and construction process.
As I mentioned above, access was a huge issue because there was none. The only corridor into the back was via a narrow side yard and over a 10-foot retaining wall.
 Figure 5
There was no way to move any sort of heavy equipment into and out of the work area without craning everything over the house, which was completely out of the question. I met with one of my outstanding subs, Martin Blaha from JMI Steel, to discuss how we were going to move machines and materials.
I knew the only way to do it was to build a steel ramp down and over the side yard that would be large and strong enough accommodate access for Bobcats, backhoes, forklifts and all the materials needed for the project. We calculated that we'd need a ramp built at an approximate 3:1 slope and eight feet wide. It turned out to be 34 feet long over a ten-foot drop, and built using I-beams and tubular steel. The ramp had to bridge over the air-conditioning units, which in turn meant we had to build a tent over them to prevent damage from material falling through the spaces in the ramp's surface.
Traction was also a major issue because having a piece of machinery sliding is not good construction practice. That's the reason we didn't use steel plates to create a smooth surface. Instead we used I-beams on their sides to create a ridged surface that would provide ample traction.
Admittedly it was an extreme measure but it enabled us to bring in the equipment to remove the concrete, spoils and landscaping and then subsequently bring in everything needed to build the pool. The only other alternative would have been to have laborers trudge up and down steps and do all the work without the assistance of machinery. In all likelihood that would've added a huge amount of time to a process that already was going to take a year, it would have been extremely expensive with a huge labor force, and very likely would have been dangerous.
The ramp (Figure 3) wound up costing about $40,000 and took a full week to construct, craning in the steel components and then welding everything together. It turned out to be worth every dime as it provided ready access through the entire process, which lasted 18 months.
 Figure 6
Down by the pool, we also had to open a six-foot section of the retaining wall surrounding the pool area for access, which was allowed so long as we reinstalled it exactly per building department recommendations. The area we opened was conveniently where the existing plumbing lines ran, which had to be removed anyway.
Out With The Bad
With ramp in place, we dove into the process by first removing the unsightly landscaping. The plantings were typical of the late '50s/early '60s era comprised of palms, assorted ground plants and lawn, none of which related to anything. It looked like it had all been just sort of plopped into place with no real landscape design. We did save a few nice specimens, but for the most part, we simply stripped the ground and started with a clean slate.
We also removed the existing glass-and-wood-framed railing from the deck area and the outdoor barbecue structure. During this time we built stairs and rails from the lower lot up into the pool area, built to permanent construction standards by Brad Pearson of Pearson Construction. Safety is an important issue on all my jobs and having a handyman come out and put up substandard steps and rails is not in my vocabulary.
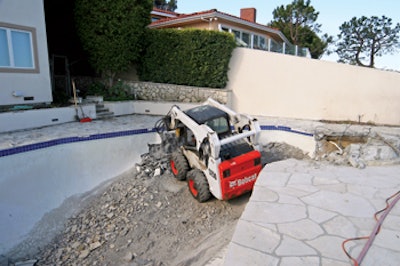
At that point, it was time to remove the existing pool, a process that I viewed as similar to cutting out a cancerous growth. Using a combination of the hydraulic hammers mounted on Bobcats, 120-pound jackhammers, chipping hammers, sledgehammers and any other hammer you can think of we obliterated the structure leaving a gapping hole in the ground (Figure 4).
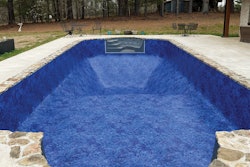
As mentioned above, however, the concrete decks had to remain in place per the building department's requirements. The decks were surfaced with a beautiful blonde "Palos Verdes" stone, which is almost impossible to find these days and probably costs about four to five times more than typical flagstone. We carefully lifted the stone off the concrete and stacked it on pallets for later use. This left us with a stripped concrete sub-base and mortar (Figure 5).
 Figure 7
At that point, we could see just how bad the soil surrounding the pool really was, and it indeed was something to behold. The pool was in four different types of mostly incompetent material comprising bedding planes sloped away from the home (Figure 6). Without going into too much detail, it was a condition where you had possible differential settlement, different expansive values and different types of stone with rocks all over the place. Suffice to say when we inspected it I was surprised the existing pool hadn't cracked.
We also discovered that the existing decks were not only out of level, but the elevations based on site conditions were wrong. They had been raised in multiple pours because apparently the original builder had blown the level on the original deck, so there was a surprisingly substantial amount of concrete in decks and other telltale signs of poor construction, including step risers that were unequal and out of level.
Based on our inspection and a soils report by Wayne Schick of Schick Geotechnical, a professional I've worked for more than 30 years, we were able to determine that approximately half of the pool bottom was on competent soil, while the outer portion toward the down-slope side needed to have a footing extending down an additional three to five feet to properly anchor the pool. Based on the revised geotechnical information, we then went back to our structural engineer, Mark Smith in Tarzana, Calif., to obtain a proper section for the new construction.
And this is a major point, one I make over and over again in classrooms, in print and pretty much to anyone who will listen: All structural plans must be site-specific and relate to the existing geological conditions. The soils determine the structure and you cannot engineer a pool without understanding the geological conditions! Had we gone in with some sort of template or off-the-shelf plan without engineering in these conditions, it would've been a disaster in the making!
On this type of construction there's no room for guessing. It's not a practice run.
 Figure 8
Tight Lines
We'll talk more about the structure in the next article. Getting back to the process, at this point we have a hole in the ground surrounded by deck. The next thing we had to do was lay out the newly designed pool's shape. We used chalk lines to define the shape of the new vessel, taking into consideration the different sizes of the bond beams, mastic joints and the details for the new construction.
We then followed the chalk lines with manual saw cuts to create the exact shape of the new pool (Figure 7). Then we took two-by-fours and attached them to the concrete to create forms based on finished elevation of the pool. These two-by-fours now resembled normal construction of a pool excavated in earth, although in this case setting on concrete.
I then called Schick back to the job to verify the excavation for proper embedment into the bearing material, to make sure the pool wouldn't move (Figure 8). (I did not want the existing decks or walls to have any bearing on the structural aspect of the construction.)
With all of that site preparation and planning, we were now ready begin the construction process, which we'll cover next month.