


It's October, and pool care professionals North and South are looking to their filters for impending maintenance.
In the North, pool professionals are getting pools locked down and ready for the snowy season to come. Meanwhile, in the still warm and sunny South, while formal winterizing is not on the agenda, filters are still in need of maintenance as the blazing summer recedes, leaving media full of suntan oil, bits of palm frond and plain old dirt.
Here, we’ll talk about how to approach both situations and the tips experienced service techs use to provide the fastest and most complete filter care — starting with the lower latitudes where the pools never really close. Here, in places like Miami and Galveston, after a hot summer season, techs are reading the pressure gauge, measuring the differential in pounds per square inch (psi) to see if it’s time for a backwash.
Many service technicians record pressure readings at the time of pool opening and at subsequent visits, and leave the information posted near the filter in the pump room, perhaps on a clipboard, or log it into the customer’s pool chart.
It’s an important practice, says John Watt, product specialist at Pentair. “One of the most important figures to note is the initial psi on the gauge at the top of the filter tank. If a pool is having trouble with water turbidity or with the heater cycling while trying to maintain the proper water temperature, service techs can start their diagnosis by looking at the filter pressure reading.”
RELATED: Winterizing Inground Pools, Step by Step
If that pressure reading at pool opening was 18 psi but the gauge now shows 30 psi, a good backwash should allow the water to clear and might even fix the problems with the pool water heater.
That’s standard operating procedure for pools with single-speed pumps. However, a new challenge has presented itself with the emerging dominance of variable-speed pumps. “In the past it was simple, the pump was either on or off and you just took the psi measurement,” says Dan Lenz, vice president of All Seasons Pools & Spas in Illinois. “But now that the pump isn’t on at full flow all the time, it becomes harder to get an accurate psi reading because as flow increases, pressure increases and not necessarily because of a dirty filter.”
Because variable-speed pumps run at…variable speeds, it becomes harder to obtain an accurate psi reading. In the case of VSPs, the flow increases and the pressure also increases, but not necessarily because the filter is dirty. To overcome this issue, many service techs today turn up the pump to the highest pre-set circulation speed (not the highest speed on the pump) take a psi reading during their weekly service, then log it on the clipboard chart hanging next to the pump. “Those service techs that aren’t doing a weekly service,” says Watt, “often ask their customers to perform this task and tell them to call the pool service company if the psi increases by more than 10 pounds.
“Cleaning the filters when there is a 10-pound increase in pressure is especially important with cartridge and D.E. filters as it can prolong the life of the filter.”
Following this procedure will help avoid compression and compaction of dirt and debris on the face of the grids and or cartridges, making them last longer and easier to clean. “In the past it was common to watch the psi reading and if there was an increase in 25 pounds, it was time to backwash or clean the filter,” Lenz says. “However, with cartridge filters, it’s now safer to advise cleaning the filter when there is a 5-pound increase in pressure. Sticking to this rule of thumb really prolongs the life of the filter. If you wait for a 10-pound change in pressure, the pleats begin to collapse and the bands start to break.”
If a pool is equipped with controllers, they can be invaluable when it comes to knowing when to backwash a dirty filter. “Rather than having to do manual checks weekly, you can use an automatic controller to set backwash based on psi readings,” says Mike Fowler, commercial sales manager at Pentair. “Pool professionals that truly understand the filter/pump relationship can incorporate filter cleaning best practices into their winterizing routines and give their customers clean and clear water in the spring.”
TIPS FOR CLEANING, BY FILTER TYPE
Sand Filter Backwash: Begin by determining the proper backwash flow rate, which should be 15 to 20 gpm per square foot. For example: A 3.1-squarefoot sand filter needs no less than 46.5 gpm and no more than 62 gpm.
Both too much and too little can be a problem. “If you don’t have enough water flow, you will not remove the debris from the sand bed completely and that remaining debris will work its way deeper into the filter,” says Watt. When this happens, the debris in the bottom of the filter can turn to caliche, a hard calcium-based compound, which is hard to break up and remove, often leading to failure and replacement of the entire unit.
On the other hand, he says, “Too much water flow can potentially lift the sand bed and pass it to waste, or worse, you could damage the laterals and or filter tank from the sandblasting effect as the water is introduced at the bottom of the tank at a high velocity.”
Brett Huston, owner at Patio Pleasures in Wisconsin and AQUA 100 winner in 2019, may discover such damage at the end of the swim season.
“When we open up the filter to winterize the pool, we discover the laterals are broken, or we see sand in the pool which often means that the laterals in the sand filter have broken,” he says. His company keeps replacement parts on the truck for a fast and efficient fix when necessary, part of his winterizing practice to get filters fixed before closing the pool so his team can get the pools open more efficiently in the spring.
Huston also suggests that service techs warn the customer that there can be a lot of time and expense associated with changing the sand in a sand filter. “Recently it took us over 8 hours to change the sand on a commercial sand filter. We had to chisel the sand out of the filter with a hammer and chisel, literally,” he says.
RELATED: Winterizing Revisited
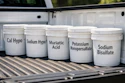
A good tip for making the tough sandbed cleaning job easier is to add a little dry clarifier, says John “The Legend” Bokor, manager at Haviland Pool & Spa Chemicals. “When cleaning sand filters, it’s important to turn off inlets for all chemical feeders, then with the pump running and filter in the backwash position, add 6 to 16 ounces of dry clarifier through the skimmer,” he says. “You can also add the clarifier directly into the filter media, let soak for four hours or longer. After soaking, start pump with filter in the backwash position.” After aiding the cleaning process, the clarifier will wash out of the filter completely during the backwash and won’t leave any residual.
It’s important to stay regular and measured in backwashing sand filters, as cleaning them too frequently can cause problems, especially in desert or dusty environments. In some cases silt can pass completely through a newly cleaned filter. “This results in calls from pool owners complaining they have sand in their pool and that additional sand comes out of the pool returns when they vacuum,” Watt says. In order to diagnose this situation, brush the pool and see if the “sand” makes a pile or a cloud in the pool. If it makes a pile there could be an issue with the filter. If it makes a cloud it is not sand, but rather silt. “If it is ‘silt’,” Watt says, “the problem is that the sand filter is actually too clean and therefore should NOT be backwashed.”
When a sand filter is very clean, the debris cake is gone, which allows larger particulates to pass through the filter. This is a sign to stop backwashing the filter, and allow it to load up and use the trapped particles themselves to help filter fine debris. A little clarifier or flocking agent can help with this.
Watt adds that the habit of waiting until backwash flow turns clear is both wasteful and poor practice. “The length of a sand filter backwash should not be determined by looking at the water flowing out of the backwash line,” he says. “Sand filter backwashing should be done in 3 minutes. Set a stopwatch for a 3-minute backwash cycle, and don’t guess.”
After all this focus on best practices for sand filter backwashing, it can be easy to forget that eventually the sand itself wears out and must be replaced. This job is notoriously arduous and time consuming. “We find that to change the sand in a filter it takes us anywhere from 1-6 hours depending on the size and the degree of dirtiness of the sand,” says Huston.
He tries to set expectations with the customer, so they won’t be surprised at the necessity or the cost. “For example, with a commercial pool we tell the facility they must change their sand every 3-5 years depending on the bather loads of the pool.” Many pool owners, both commercial and residential, don’t realize the sand in the filter needs to be changed regularly, but “like the oil in your car motor, we tell our customers the sand in the filter gets dirty and needs to be changed,” Huston says.
RELATED: Closing by the Temperature
A variety of tools are used for this hard and dirty job — whatever gets it done is the right one. “We have been known to use a screwdriver, chisel or whatever can fit into the narrow area available once the filter has been opened,” says Huston. If the sand can be broken up and loosened, generally pool professionals use a shop vac to suck out the dirty sand rather than scooping it by hand, to speed up the process. “We also prefer to change the sand in filters in the spring — after it has sat empty all winter and has dried out — so the sand doesn’t have all the water in it making it heavy,” says Huston. “The lighter sand is obviously easier and faster to remove.”
Biguanide note: Don’t forget that there is a difference in the amount of cleaning required when dealing with pools that use biguanide sanitation. “Our experience has been that the biguanide systems require more cleaning and changing of the sand because the biguanide makes the sand clump,” explains Huston. “This clumping will frequently lead to the creation of channels in the sand where the water quickly finds its way back into the pool without being cleaned by the sand. It’s fairly easy to know that this is happening when nothing happens to the water clarity after backwashing.”
D.E. Filter Backwash: Unlike sand filters, backwashing D.E. filters frequently does not affect the filtration rate. However, it does create extra work and expense for service techs. D.E. filters should be backwashed for the same 3 minutes as sand filters, but the cycle should be broken down into a 1-minute backwash, then a 1-minute filtration for three separate cycles (making sure you shut the pump off each time you switch between backwash and filtration).
This procedure helps to separate the D.E. coating from the grids so it can be removed from the filter. A D.E. filter should be backwashed when the pressure differential reaches 10 psi. In
addition, says Watt, “A D.E. filter should be torn down, cleaned and degreased at least twice a year. Body lotions and sunscreen collect on the grid material and cannot not be backwashed away.” A degreasing agent be very helpful in this process, he adds, “but it’s important to note that muriatic acid will permanently lock the oils and lotions into the grid material and is therefore not recommended.”
D.E. Filter Recharging: When recharging the D.E. filter, always follow the manufacturer’s recommendation as to the amount of D.E. used to charge the filter. The proper way to charge the filter is to use a 5 gallon bucket then add water and D.E. together to create a slurry. Slowly pour the slurry into the skimmer while the pump is running. This will ensure that the grids or elements are properly coated from top to bottom.
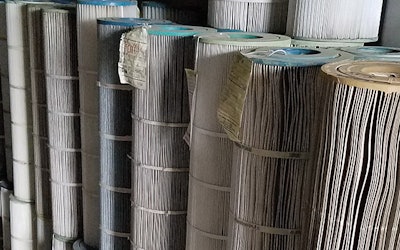
Cartridge Filters: Cartridge filters are not designed to withstand water flow in the reversed direction, therefore they must be taken apart and the debris sprayed off. Body oils and lotions are the number-one contributor to a plugged cartridge filter, so getting the oils and lotions off the fabric surface is the difference between frequent cartridge replacement and cartridges that last and run a longer time between cleanings. The oily buildup on the surface plugs up the pores on the cartridge, which restricts water flow and creates a sticky surface. Cartridge filters trap dirt on the surface and when the filter is turned off the debris falls to the bottom of the tank to free up more surface area for the next cycle. If the surface of the cartridge is sticky the debris does not fall away causing the filter to plug up in a very short period of time.
RELATED: Don't Wait to Hibernate
Many pool service professionals now offer winterizing cartridge filter cleaning services. Not only do they hose off the filter, they soak the filter with muriatic acid and a filter cleaning agent, then re-soak the filter with a liquid chlorine bath to brighten and lighten the filter (making them look nicer when returned to the client). Finally, the filters need to air dry before using them again.
“With cartridge filters, we like to remove the cartridges when we close the pool because we have such drastic fluctuation in temperature from month to month throughout the winter and
into the early spring,” says Huston. “Those temperature changes can lead to mold developing in the cartridge media which is very hard to remove.”
CARTRIDGE FILTER MEDIA CLEANING TIPS:
For pool professionals offering a winterizing cartridge filter cleaning service, a step-by-step procedure will ensure the best results. A few suggestions:
Step 1: Hose off filter. Begin by hosing off the filter from top to bottom using a normal garden hose. Never pressure-wash the filter because the bands that hold the pleats in place can snap under pressure, causing the pleats to collapse on themselves, reducing the surface area of filtration.
Step 2: Soak filter. After hosing down the cartridges it’s important to put the filters through a soaking process. All Seasons soaks their cartridge filters overnight in 55-gallon plastic buckets that contain muriatic acid and some filter cleaning agent available from pool chemical manufacturers. “ProTeam offers an excellent product called Filter Magic that quickly loosens and removes oils, combined organic matter, calcium deposits and biguanide polymer material,” says Lenz.
Step 3: Repeat Soak. Once the filters have soaked overnight, some pool professionals will lightly rinse the filters then place them in a clear water drum to soak again. Then there is an optional soaking that can be performed which involves soaking the filters in a liquid chlorine solution to brighten and lighten the filters. “We do this final soaking — so they look nicer when we give them back to the client,” notes Lenz. Sometimes pool professionals will find they even need to repeat all of these steps depending on how dirty the filter cartridges are.
Step 4: Air dry. Once the cartridges are clean, it’s best to air-dry them before re-using. “We suggest that the pool owner have two sets of cartridges,” says Lenz. “This allows one set to be in use while the other set is being cleaned.” The drying time gives the cartridge time for the fibers to fluff-up, because the fibers need to expand to be effective. If not, they are easily pushed down which can reduce holding power and shorted the filter cleaning cycle.
“The service professionals that do the best work are those that take the filter media with them when they close the pool for the season, clean it at their shops and bring back clean, ready-to-use filters in the spring when they reopen the pool,” says Bokor. “They charge extra for the filter cleaning service and they have a customer with cleaner pool water all summer.”