


It's late September, mid-morning, and somewhere in North America, a closing crew has already finished three pools and is hard at work on a fourth. That includes travel time. There is very little fat on the day of a pool closing crew. No extra time for lunches or even bathroom breaks, no talking with pool owners who have questions, and certainly no time for petting cute dogs that wander over to watch you work, which is in and of itself, a crime.
This pool closing crew, and thousands more just like it, burst into a backyard like Seal Team Six and within 90 seconds of arrival, every tool needed to effectively close the pool is already deployed. The pump has been hauled out of the truck and set up, and is already running with the discharge hoses stretched out to the road, draining down the water level in the pool. One person is now wrestling the pool cover toward the pool while the other (more experienced) person is over at the equipment pad starting to disassemble the pump, filter, heater and salt system.
The speed at which an experienced technician can accomplish this work is astounding to the uninitiated. Full disassembly of the pump, filter, heater draincocks, closing the gas valves, removing the salt cell...all of this is completed in about 60 seconds. This is because pool equipment is not all that complicated, and winterizing is a pretty straightforward process with almost all brands, makes and models of pumps, filters and heaters being winterized in the same way.
There is no backwashing of filters or final running of the pump for the closing crew. All of that needs to be done in advance of their arrival because once they get there, everything will be in pieces within minutes. It’s all about the three “f’s” — fast, focus and efficiency.
Take the lid off the pump, remove the strainer basket, and rinse out the leaves and debris. Now, remove the two drain plugs on the pump, front and side, and deposit these into the empty pump strainer basket for winter storage. Now the pump is winterized. The plugs are removed, and the pump will drain out. The winterizing plugs will either be wing nut, which you can unscrew by hand, or 9/16-inch plastic-sized nut, most commonly.
THE FILTER’S TURN
All three filter types, sand, cartridge and D.E. filters, need to be drained to avoid breaking when the freezing temperatures arrive. Sand filters are unique in that after backwashing and rinsing, you simply open the bottom drain and then set the filter head to winter.
The other two need to be opened, disassembled and cleaned for the season. They take a little more time, even for a special forces pool pro, but a skilled technician can have the split flange apart and the filter elements/grids out quickly. This flange uses brass or some kind of soft metal head on the nut, but the pro isn’t using channel locks or an adjustable wrench on it. The pro has the correct socket and with a few rapid clicks, it’s off.
In a moment, the pressure gauge and sight glass is removed, the air relief valve is left in the open position to prevent it from trapping water where it can freeze, expand and cause damage, and it’s on to the heater.
HEATER CLEAR!
Pros live long lives by thinking safety first, so when a skilled technician gets ready to winterize a gas heater, they will close the external gas supply valve and turn off the power to the heater. Next, they will open the front service access and turn off the secondary gas valve, as well as opening the pressure switch if the heater is equipped with one. This usually demands a 7/16-inch wrench along with a 1/2-inch wrench, though sometimes you need two 7/16-inch wrenches. After this, the draincocks are opened, which are either just like the two from your pump, or may be brass, but they are removed so you can blow through the heater and eliminate all of the water that is trapped inside. When I get to this stage, I usually leave my blower blowing through the heater for a few minutes while I walk away to take care of something else. This helps to atomize all of the residual water and moisture within the heater, which is the goal — to leave it as dry as possible.
SALT CELL
To winterize a saltwater chlorinator, you simply power off the unit and unscrew the generator cell. You should clean it over the off season and install a “dummy cell” or rubber plugs to prevent water or pests from making a winter home inside of your pool pipes.
People tend to assume the pool equipment is the hard part about winterizing, and it’s really not. It is definitely expensive if you make a mistake and something ends up broken, but if everything goes well, it takes only a few minutes and a few tools to fully close and winterize all of your pool equipment. By leaving all of the plugs you remove right in the skimmer basket, you can be sure they will all be there when you put it back together in the spring. If you take all this stuff away and store it in a shed, the garage or your basement, it will be missing by spring with shocking regularity.
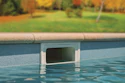
So up until now, our team of pool closing commandos has been working calmly and quickly for about 10 minutes in total. The entire equipment pad is now winterized. The pool, which has been draining with a large discharge pump this whole time, is now just about at the bottom of the returns which is perfect for the rest of the process. That pump is shut down, rolled up and put back in the truck. Now, the blower — which was used to empty the equipment — is set to blow through the skimmer for a few minutes while the two-person crew orients the cover correctly on or next to the pool.
Once the skimmer is dry, the antifreeze and gizzmo are added, and the blower is switched to blow through the return pipes now. The crew blows out all returns, and then systematically closes all but one return to evacuate the maximum amount of water from inside the system. Winter plugs are then installed, and the cover is stretched over the pool and fixed in place — and you’re done.
CLOSING DETAILS
While the main service tech has been winterizing the equipment, the helper has been locating the pool cover to the side of the pool and preparing for installation. During this time, the ladders were removed from the pool and winterizing chemicals added to the water, as the pool owner requested and paid for that. Chlorine was added as well to help keep it clean and clear over the long winter season.
For this crack team of well-seasoned pros, even the biggest and most complicated of pools only takes two or perhaps three hours at most to close and winterize, while the easiest of pools can sometimes be fully closed and winterized in as little as 15 minutes.
Why all this obsessive focus on speed and precision? Because there are hundreds of thousands of pools above the frost line, from Salt Lake City to Pittsburgh to Toronto, and pretty much every one of them wants to close up at the same time!
Steve Goodale is a second-generation swimming pool expert located in Ontario, Canada. You can learn more about Steve, as well as swimming pool construction, maintenance and repair from his website: SwimmingPoolSteve.com